http://www.etsy.com/shop/RainyDaysJoy
Currently the products are finished products I've made to craft markets. Go and check them out (and you're welcome to buy them too :-D)
DIY & Arts and Crafts---- www.rainydaysjoy.com.au---- www.facebook.com/RainyDaysJoy-- MELBOURNE, AUSTRALIA
Thursday, 28 June 2012
Monday, 11 June 2012
RECYCLED CRAFTING - Beautiful Bottle!
I just love recycled crafts, and if I could, that’s
what I would do all day long, every day… until I would run out of cans and glass
bottles, and I’d have to start consuming them to get some new things to create :-D.
But here’s a tutorial how to make something like this:
You need: empty and washed tin can/bottle/glass/glass jar, yarn, felt to make the flower decorations (check the tutorial from the last entry), black cardboard, printed words/quotation, ribbon, glue, scissors.
If your reuse product is a tin can, first make sure the sharp edge inside will not harm anyone. I use pliers to flatten the sharp edge.
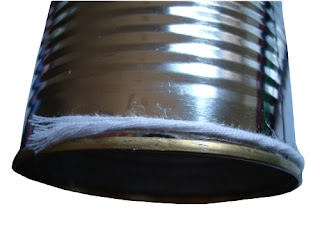
Coat the tin can or bottle with yarn. Start by attaching the yarn to the tin can/bottle with glue. Then start rolling the yarn.
Continue rolling. After the first round you don’t have to add glue (except to the end)
If you want to make your bottle or can out of two colours, just tie 2 different yarns together, cut the first one and continue to roll with the second yarn.
When you get to the end, glue the last round of yarn to the can / bottle.
Then decorate the can/bottle.
- Glue on some felt flowers. (check the tutorial how to make them from the previous blogpost)
- Make a label: Print the word(s) you want (for example “PENS” or “TOOTHBRUSH”) Then glue it/them to the slightly bigger piece of black cardboard so the word(s) get a nice black thin “frame”. To hang the label, make two holes to sides and thread the ribbon
- or make a quotation: Print and cut out the quotation word by word, then glue the words to the black cardboard and glue them to the face of the can/bottle.
WELL DONE!
-------------------------------------------------
IT WOULD BE GRAT IF YOU WOULD LIKE RAINY DAYS JOY AT FACEBOOK; www.facebook.com/RainyDaysJoy THAAANNNKKKKSSSSS :-D
IT WOULD BE GRAT IF YOU WOULD LIKE RAINY DAYS JOY AT FACEBOOK; www.facebook.com/RainyDaysJoy THAAANNNKKKKSSSSS :-D
-------------------------------------------------
Wednesday, 6 June 2012
FELT FLOWERS TUTORIAL
Felt flowers are a great decoration for many different
purposes. I will use these flowers in my next project, where tin cans and old bottles
will get a new life. I just looooooovvveee recycled crafts.
But first we’ll have to learn how to make these cute flowers. Let’s start from the outcome:
Flower number 1:
Flower number 2
Cut 5 felt-circles. (I used 1 dollar coin as a template. )
Fold the circle, and push the needle trough the other end (and of course you have a threaded needle, and a big knot in the end of the thread).
Add the rest 4 circles.
Sew trough. I sew twice trough all 5, just to make sure.
Spread the petals to flower shape, tighten the thread and then finish with a knot.
But first we’ll have to learn how to make these cute flowers. Let’s start from the outcome:
Flower number 1:
Flower number 2
You will need: a piece of felt (or wool.. or any other thick
fabric), needle and thread.
Flower number 1:
Cut 5 felt-circles. (I used 1 dollar coin as a template. )
Fold the circle, and push the needle trough the other end (and of course you have a threaded needle, and a big knot in the end of the thread).
Add the rest 4 circles.
Sew trough. I sew twice trough all 5, just to make sure.
Spread the petals to flower shape, tighten the thread and then finish with a knot.
Flower number 2:
Cut a felt circle. I used a bottom of a glass as a template.
Cut the circle to a spiral.
Start rolling the flower from the inner end. (At this stage, the needle in the picture is just to hold the form while I’m taking the picture)
When you are ready, stitch twice trough the flower to secure it. I have seen tutorials that use glue to secure the flower, but I like to sew it. If you use glue, then glue the last roll.
There you are!
And at the next blog at the end of this week, I’ll show you how
did I use these flowers.
-------------
BTW, GO TO FACEBOOK AND LIKE RAINY DAYS JOY! In June, the first 100 AUSTRALIAN (sorry my international friends! But please do hint all your Australian friends about this!!!!) likers will get a surprise gift for free .
-------------
BTW, GO TO FACEBOOK AND LIKE RAINY DAYS JOY! In June, the first 100 AUSTRALIAN (sorry my international friends! But please do hint all your Australian friends about this!!!!) likers will get a surprise gift for free .
Subscribe to:
Comments (Atom)


