Thursday, 20 December 2012

Wreath, wreath and wreath

I made three wreaths last weekend - the first one was for my dear friends at Sabre Lou Products, Troy and Shane.  They make beautiful sentenced soy candles and waxes. This wreath was not actually Christmas themed, but it was a Christmas present for them. It was made using a styrofoam wreath-base, yarn, felt flowers (tried to copy the look they have in their logo) and their logo glued in the middle. I didn't take any picks while making it, but basically you just roll the yarn around the styrofoam base, glue the flowers (there's a tutorial HERE how to make them), print the picture and glue it to a slightly bigger cardboard and glue it to the backside of the wreath.
 
The second wreath was for my friend Paula, who invited us for a visit. This is made of Christmas ornaments glued to a cardboard base. I'll post the tutorial for this later today.

And while the glue gun was still hot, I decided to make one more wreath to our own door. Our color theme this year is blue and silver, and luckily our door is blue too. It fits perfectly!
HAPPY HOLIDAYS!

Tuesday, 18 September 2012

100 days untill Christmas

It's all about Christmas now! I didn't quite understand how early you should start planning and creating Christmas products when you are in crafting business - I'm already a bit late. Luckily I have a lot of ideas spinning in my head, Christmas crafting has always been a big thing at our household so I do have around billion ideas what to do. Now I just have to organize all of them and choose the best ones. But here's a sneak peek for you; I hope Australians will get excited about these very Scandinavian style Christmas Elves. P.S. This package will be one of those "no glue or scissors needed = no mess" craft packages. Jei!

Thursday, 16 August 2012

Felt flower ideas - decorate and upcycle with mimal budget!

In one of the earlier blog posts I wrote how to do these gorgeous felt flowers. I personally fell in love with them, and nowadays they are part of my product selection at the craft markets. I've also decorated a lot of items here at home with them. Here's some ideas what I did with them - they are just perfect and cheap little decorations to upcycle and personalize many different things.

I will soon update the webshop with these felt flower packages, in case you don't have the time or energy to do them yourself. So stay tuned and check www.rainydaysjoy.com.au and www.facebook.com/RainyDaysJoy for more info!

1.  (recycled) Tealight candle holder.
I first rolled some white yarn around an old small glass cup, using craft glue to stick the yarn to the glass. Then just glued the felt flower. It looks REALLY good with a candle burning inside.


2. Canvas.
I glued the flowers to the canvas with craft glue. The canvas was around $2 at K-Mart.


3. Photoframe.
This is a cheap wooden frame from Ikea, which I have spraypainted white. Glue the felt flowers to the corners with craft glue.


4. Hairband.
 This basic black hairband was $3 from K-mart, and the felt flowers are sewn into it with couple simple stitches.


5. Scarf.
I love scarfs, and of course I had to have a matching scarf to my new gorgeous hairband. 


Next project with these felt flowers will be couple pillows to our sofa. I'll post a picture when it's finished, but I'm sure it will look great with the frame, tealight holder, and  the canvas!


Tuesday, 24 July 2012

Recycle your old glass jars - with DECALS!

As said before, I love recycling and a while ago I was looking for an idea what to do with my old glass jars. There's a small hoarder living inside of me (or a big, if you ask my husband), so it's really hard for me to anything away, which I can reuse later on.... Then one day, one of my friends, Miia, came for a coffee and gave a wonderful idea what you can do with glass jars and decals. So before long, I had made these:


Last weekend's craft market I tested this idea commercially, and people were really exited about this! I sold quite a many small Coin/Salt/Sugar/Flour/Coffee/Tea decals. I will soon update all of them to my webshop www.rainydaysjoy.com.au , so please do pop by and order yours. This is such a great idea to recycle your old glass jars, it makes a great (and cheap) gift!

So this is what's in the package:
1. Instructions
2. The decal
3. Example print of the text in the decal

And this is what you need when you start doing this:
1. Glass jar
2. Water
3 Sponge or paper towel
4. Decal


And here's how, all this takes only couple minutes!
(Just a note, that the decal is actually a really thin film between papers A and B, and the whole thing is just to remove both papers, A and B, and then melt the film tightly to glass by baking it):

1. Wet side "A" with wet sponge (or paper towel). Use quite a lot of water.

2. Remove the "A"side.


3. This is how the rest looks like now, a mirror image of the outcome:

 4. Dip the decal entirely to water
5. Place it to the glass jar
 6. Gently and slowly remove "B"-paper
7. Gently smooth the decal with your fingers to remove the excess water and bubbles. You can still slide it a bit and correct the placement if needed.

8. Bake the item in microwave for 3 minutes at high temp, or 5 muntes at low temp, or in an electric oven about 8 minutes 160-180 degrees. Please be careful with the glass when you take it out from the microwave - IT IS HOT!!!


Let it cool down, and if you want better gloss result and stronger decal, bake the item twice.

Thursday, 28 June 2012

Rainy Days Joy is now also on ETSY!

http://www.etsy.com/shop/RainyDaysJoy

Currently the products are finished products I've made to craft markets. Go and check them out (and you're welcome to buy them too :-D)

Monday, 11 June 2012

RECYCLED CRAFTING - Beautiful Bottle!


I just love recycled crafts, and if I could, that’s what I would do all day long, every day… until I would run out of cans and glass bottles, and I’d have to start consuming them to get some new things to create :-D.

But here’s a tutorial how to make something like this:


You need: empty and washed tin can/bottle/glass/glass jar, yarn, felt to make the flower decorations (check the tutorial from the last entry), black cardboard, printed words/quotation, ribbon, glue, scissors.

If your reuse product is a tin can, first make sure the sharp edge inside will not harm anyone. I use pliers to flatten the sharp edge. 


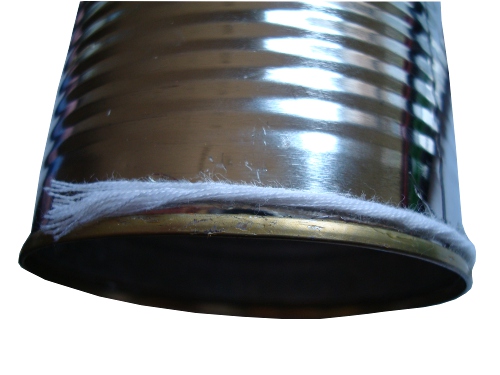
Coat the tin can or bottle with yarn. Start by attaching the yarn to the tin can/bottle with glue. Then start rolling the yarn.


Continue rolling. After the first round you don’t have to add glue (except to the end)


If you want to make your bottle or can out of two colours, just tie 2 different yarns together, cut the first one and continue to roll with the second yarn.
When you get to the end, glue the last round of yarn to the can / bottle.


Then decorate the can/bottle.
- Glue on some felt flowers. (check the tutorial how to make them from the previous blogpost)
- Make a label: Print the word(s) you want (for example “PENS” or “TOOTHBRUSH”) Then glue it/them to the slightly bigger piece of black cardboard so the word(s) get a nice black thin “frame”. To hang the label, make two holes to sides and thread the ribbon
- or make a quotation: Print and cut out the quotation word by word, then glue the words to the black cardboard and glue them to the face of the can/bottle.

WELL DONE!
-------------------------------------------------
IT WOULD BE GRAT IF YOU WOULD LIKE RAINY DAYS JOY AT FACEBOOK; www.facebook.com/RainyDaysJoy THAAANNNKKKKSSSSS :-D
-------------------------------------------------

Wednesday, 6 June 2012

FELT FLOWERS TUTORIAL

Felt flowers are a great decoration for many different purposes. I will use these flowers in my next project, where tin cans and old bottles will get a new life. I just looooooovvveee recycled crafts.

But first we’ll have to learn how to make these cute flowers. Let’s start from the outcome:
Flower number 1:


Flower number 2


You will need: a piece of felt (or wool.. or any other thick fabric), needle and thread.
Flower number 1:

Cut 5 felt-circles. (I used 1 dollar coin as a template. )


 Fold the circle, and push the needle trough the other end (and of course you have a threaded needle, and a big knot in the end of the thread).
 Add the rest 4 circles.
  Sew trough. I sew twice trough all 5, just to make sure.
 Spread the petals to flower shape, tighten the thread and then finish with a knot.


Flower number 2:

Cut a felt circle. I used a bottom of a glass as a template.  
Cut the circle to a spiral.

Start rolling the flower from the inner end. (At this stage, the needle in the picture is just to hold the form while I’m taking the picture)

When you are ready, stitch twice trough the flower to secure it. I have seen tutorials that use glue to secure the flower, but I like to sew it. If you use glue, then glue the last roll.


There you are!

And at the next blog at the end of this week, I’ll show you how did I use these flowers.
-------------

BTW, GO TO FACEBOOK AND LIKE RAINY DAYS JOY! In June, the first 100 AUSTRALIAN (sorry my international friends! But please do hint all your Australian friends about this!!!!) likers will get a surprise gift for free .