Tuesday, 24 July 2012

Recycle your old glass jars - with DECALS!

As said before, I love recycling and a while ago I was looking for an idea what to do with my old glass jars. There's a small hoarder living inside of me (or a big, if you ask my husband), so it's really hard for me to anything away, which I can reuse later on.... Then one day, one of my friends, Miia, came for a coffee and gave a wonderful idea what you can do with glass jars and decals. So before long, I had made these:


Last weekend's craft market I tested this idea commercially, and people were really exited about this! I sold quite a many small Coin/Salt/Sugar/Flour/Coffee/Tea decals. I will soon update all of them to my webshop www.rainydaysjoy.com.au , so please do pop by and order yours. This is such a great idea to recycle your old glass jars, it makes a great (and cheap) gift!

So this is what's in the package:
1. Instructions
2. The decal
3. Example print of the text in the decal

And this is what you need when you start doing this:
1. Glass jar
2. Water
3 Sponge or paper towel
4. Decal


And here's how, all this takes only couple minutes!
(Just a note, that the decal is actually a really thin film between papers A and B, and the whole thing is just to remove both papers, A and B, and then melt the film tightly to glass by baking it):

1. Wet side "A" with wet sponge (or paper towel). Use quite a lot of water.

2. Remove the "A"side.


3. This is how the rest looks like now, a mirror image of the outcome:

 4. Dip the decal entirely to water
5. Place it to the glass jar
 6. Gently and slowly remove "B"-paper
7. Gently smooth the decal with your fingers to remove the excess water and bubbles. You can still slide it a bit and correct the placement if needed.

8. Bake the item in microwave for 3 minutes at high temp, or 5 muntes at low temp, or in an electric oven about 8 minutes 160-180 degrees. Please be careful with the glass when you take it out from the microwave - IT IS HOT!!!


Let it cool down, and if you want better gloss result and stronger decal, bake the item twice.

Thursday, 28 June 2012

Rainy Days Joy is now also on ETSY!

http://www.etsy.com/shop/RainyDaysJoy

Currently the products are finished products I've made to craft markets. Go and check them out (and you're welcome to buy them too :-D)

Monday, 11 June 2012

RECYCLED CRAFTING - Beautiful Bottle!


I just love recycled crafts, and if I could, that’s what I would do all day long, every day… until I would run out of cans and glass bottles, and I’d have to start consuming them to get some new things to create :-D.

But here’s a tutorial how to make something like this:


You need: empty and washed tin can/bottle/glass/glass jar, yarn, felt to make the flower decorations (check the tutorial from the last entry), black cardboard, printed words/quotation, ribbon, glue, scissors.

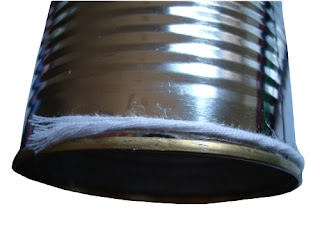
If your reuse product is a tin can, first make sure the sharp edge inside will not harm anyone. I use pliers to flatten the sharp edge. 


Coat the tin can or bottle with yarn. Start by attaching the yarn to the tin can/bottle with glue. Then start rolling the yarn.


Continue rolling. After the first round you don’t have to add glue (except to the end)


If you want to make your bottle or can out of two colours, just tie 2 different yarns together, cut the first one and continue to roll with the second yarn.
When you get to the end, glue the last round of yarn to the can / bottle.


Then decorate the can/bottle.
- Glue on some felt flowers. (check the tutorial how to make them from the previous blogpost)
- Make a label: Print the word(s) you want (for example “PENS” or “TOOTHBRUSH”) Then glue it/them to the slightly bigger piece of black cardboard so the word(s) get a nice black thin “frame”. To hang the label, make two holes to sides and thread the ribbon
- or make a quotation: Print and cut out the quotation word by word, then glue the words to the black cardboard and glue them to the face of the can/bottle.

WELL DONE!
-------------------------------------------------
IT WOULD BE GRAT IF YOU WOULD LIKE RAINY DAYS JOY AT FACEBOOK; www.facebook.com/RainyDaysJoy THAAANNNKKKKSSSSS :-D
-------------------------------------------------

Wednesday, 6 June 2012

FELT FLOWERS TUTORIAL

Felt flowers are a great decoration for many different purposes. I will use these flowers in my next project, where tin cans and old bottles will get a new life. I just looooooovvveee recycled crafts.

But first we’ll have to learn how to make these cute flowers. Let’s start from the outcome:
Flower number 1:


Flower number 2


You will need: a piece of felt (or wool.. or any other thick fabric), needle and thread.
Flower number 1:

Cut 5 felt-circles. (I used 1 dollar coin as a template. )


 Fold the circle, and push the needle trough the other end (and of course you have a threaded needle, and a big knot in the end of the thread).
 Add the rest 4 circles.
  Sew trough. I sew twice trough all 5, just to make sure.
 Spread the petals to flower shape, tighten the thread and then finish with a knot.


Flower number 2:

Cut a felt circle. I used a bottom of a glass as a template.  
Cut the circle to a spiral.

Start rolling the flower from the inner end. (At this stage, the needle in the picture is just to hold the form while I’m taking the picture)

When you are ready, stitch twice trough the flower to secure it. I have seen tutorials that use glue to secure the flower, but I like to sew it. If you use glue, then glue the last roll.


There you are!

And at the next blog at the end of this week, I’ll show you how did I use these flowers.
-------------

BTW, GO TO FACEBOOK AND LIKE RAINY DAYS JOY! In June, the first 100 AUSTRALIAN (sorry my international friends! But please do hint all your Australian friends about this!!!!) likers will get a surprise gift for free .

Thursday, 31 May 2012

YARNBALLS

Today I decided to treat myself with some hobbycrafting. Rainy Days Joy’s projects have kept me so busy, that I haven’t had any time to just do whatever comes to my mind. Today I just took the time.

I wanted to do something with the yarns I recently bought from a sale. I had some basic knitting yarn, jute yarn and white bamboo yarn from one of RDJ’s recent projects. So that’s where it all began… The idea for this project came from a picture of a spectacular styrofoam ball wreath I recently saw.

But let’s start from the outcome. Tadaaa! (can I hear you clapping? Yes I can, great! *clap clap clap*)


What you need: Styrofoam balls, yarn, couple small pins, glue (I use really good graft glue which dries in one minute).


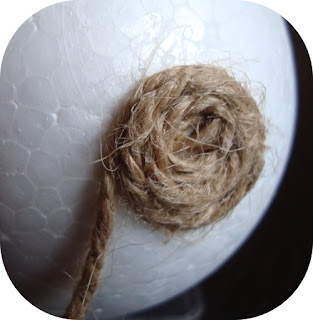
Add a drop of glue to the top of the ball and secure the attachment of the yarn to the ball with a small pin.

Then add more glue to the ball and start rolling the yarn around.

 
When you add the glue, add just one centimetre downwards at the time, otherwise the glue will dry before you get there with your yarn (look the “pink glue area” from the pic).

It might make sense to use hot a glue gun, and I actually have one, but I’m so lousy with it that I rather choose normal craft glue.  I’m such an idiot with all hot things – I've even tried with my bare hand wether the stove is hot or not.  Several times. Once I had this brilliant idea of ironing my skirt when I had it on. I still have that  “stupidity mark” in my leg, shaped like the bottom of the iron... So just normal glue for me thank you.
But now back to the ball: continue rolling the yarn.
By the way, I found that the first half of the ball is much easier to roll than the second half, so be patient in the end. And it might get a bit messy with the glue (It did for me, but I’m a bit messy person) sticking to your fingers, so be prepared and cover the table before you start.


When you get to the end, cut the yarn and secure the attachment with a small pin and a fresh drop of glue.

Well done!

--------
Have you already visited Rainy Days Joy's webshop?  wwww.rainydaysjoy.com.au
Like Rainy Days Joy in Facebook: https://www.facebook.com/RainyDaysJoy

Tuesday, 21 February 2012

....

*Trattaattaaattaaaaaaa..... drum beat and huge exitement in the air......nervous mumbling form the audience*
.
.
.
.
.
.
.
.
.
.
"KRHM!!!" comes from the loudspeakers
.
.
.
*mumbling stops, total silence*
.
.
.
.
.
" LADIES AND GENTLEMEN!
.
.
.
.
.
.
IT IS MY GREAT  PLEASURE TO INTRODUCE TO YOU..........
.
.
.
.
.
.
.
THE ................... LOGO OF RAINY DAYS JOY"


*screaming, shouting, banging foot to the floor, furious clapping, clap clap clap clap clap clap clap clap clap clap clap clap clap clap clap clap*

Friday, 3 February 2012

Laura’s first business meeting

“A man travels the world over in search of what he needs, and returns home to find it.” - George Moore

Things are progressing; a bit too slow for my taste but still… this is how it goes when you are doing almost everything by yourself and trying to do thousand things at the same time. But a lot has happened, even if the main task during the last 1,5 months has been having a superlong summer holiday, loads of fun and relaxation. For the first time in my life, I have had a chance to spend the whole holiday with Laura, and I have made sure I have taken everything out of it.

Trying to create a company from a fragile idea to a fully functioning organisation with a strong product and identity is not an easy task, especially when you are doing it in a foreign country. You barely know anyone (businesswise), and don't have much money to invest. One just has to have a lot of faith, be prepaired to work hard and a bit of that famous Finnish SISU! (Plus a lot of coffee and chocolate biscuits)
So, what have I done so far? One of the first things I did, was a business plan – to organize all those hundreds of flying ideas from my head. And the financer – my husband - also needed to be shown where all the money is going to go for the next XX years. Then I officially registered the company and booked domain-names.
At this very moment  Julia, the best Finnish graphic designer in Melbourne  is sketching a logo for the company. It sure isn’t easy task for her, since this time the customers have no idea what they want… but she is a genius on her own field and the first suggestions she sent couple days ago were magnificent. There's still a long way to the final logo and the whole visual look but we are on our way! This much is certain at this point: It will be something stylish, something very Scandinavian and there will be a kind of a “northern” trick in the logo. It will be SOOOOOOOOOO good!

One of the most fantastic things about Rainy Days Joy is that the whole family has been really excited and thrilled about it.  Laura is heavily involved at the planning process, and already proudly announced for her teacher that her future profession is “a business woman in RDJ”. She is constantly planning other businesses too, like a restaurant (she loves cooking and baking) and a fashion-company.

So last week she naturally came with me to a meeting with graphic designer Julia – she took care that I remembered to take all samples and a copy of the business plan with me. She was really serious. At one point she noticed that there is no notebook or pen in my bag for notes, so she borrowed hers, and gave me a small speech how those should never be forgotten when you go to a business meeting. Krhm.

Laura sure is an essential part of the company; she has already contributed a lot to the designs and has shared a lot of great ideas and views. I’m so proud of her, and it will be extremely interesting to see what will the future will bring for her and the company.   

Rainy Days Joy will be so much more than only a company making craft packages; it will be a family effort, it will have a strong social concept (I’ll tell more later) and it will be a window to Northern design and life philosophy. It will create joy and positive feelings, it will encourage families to enjoy the moment and stand for values of fairness and equality. And did I already say it also makes craft packages :-D.